


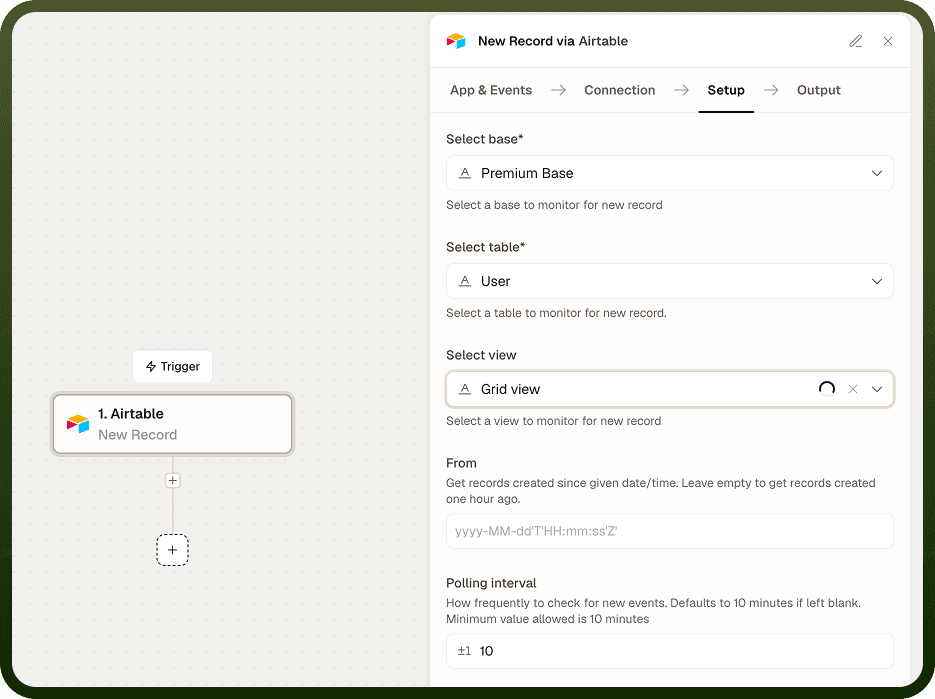
A node's properties panel presents its inputs as an intentional top-to-bottom form, where some fields — called dynamic fields — appear, disappear, or reload their options in response to what you select in earlier fields.
Overview
When you select a node on the canvas, its inputs open in the properties panel as a form. This form is generated from the operation you selected — different operations expose different fields, and some fields are dynamic: they appear, disappear, or change their available options based on what you fill in earlier fields. Understanding how fields are laid out, and why some fields behave conditionally, helps you configure nodes quickly and correctly.
Field Layout
A node's properties panel presents its inputs as a top-to-bottom form. The order is intentional: later fields often depend on the values of earlier ones, so filling fields from top to bottom is the correct sequence. Within the form you will encounter several kinds of elements:
Element | Description |
|---|---|
Input field | A field you fill with a value, a data pill, or an expression. The vast majority of elements in the form are input fields. |
Section header | A label that groups related fields together. Not a field you fill — it is organizational guidance only. |
Info box / tip callout | An explanatory note or requirement shown inline. Read it for context; there is nothing to enter. |
Divider | A visual separator between sections. Guidance only. |
Most input fields display inline help text describing what to enter. When a field has specific format requirements or constraints, the help text says so.
Mapping Data Pills into Fields
Most input fields accept a data pill — a reference to an earlier node's output or the trigger's data — in place of a typed literal value. Click into the field and insert the pill; the field resolves to that value at run time. A small number of fields are fixed-value only and do not accept pills or expressions; those fields note this in their inline help.
Dynamic Fields
Many fields in a node's form are dynamic: they are shown or hidden, and their options are loaded or reloaded, in response to what you select in an earlier field.
How Dynamic Fields Work
Choosing a value in one field — such as a connection, an object type, or an operating mode — causes subsequent fields to appear and their dropdowns to populate. For example, selecting a connection may reveal the object field, and selecting an object may then reveal the record fields for that object. This cascade continues until the full set of inputs for the chosen operation is visible.
Common Causes of a Field Appearing or Disappearing
A connection is selected or changed — reveals the fields that depend on that connection.
An object or resource is selected — reveals fields specific to that object's schema.
An operating mode is toggled — switches the form between two different sets of inputs.
A condition built into the operation's definition is met — unlocks an advanced or optional field.
Note: If a field you expected is missing, check that the field it depends on — the connection, the object, the resource — is already set. If a dropdown appears empty or stale after you change a dependency, use the field's refresh control to reload its options.
Required and Optional Fields
Required fields are marked in the properties panel. You cannot save or test a node until all required fields have a value. Optional fields may be left empty; the node will run using the default behavior for that field.
Field Groups
Related fields are grouped under section headers. A group commonly contains one required field — such as the primary resource to act on — followed by several optional fields that refine the operation (filters, sort rules, limits, and so on). Read the section header to understand what the group of fields controls before filling individual fields.
Note: Some fields are hidden until a condition is met, so the form can appear shorter than the full set of options available for that operation. Filling the gating field reveals the rest.
Notes
To make the most of field layout and dynamic fields:
Fill the form top to bottom — later fields frequently depend on earlier selections and may not load until earlier fields are set.
Read section headers and info boxes before filling fields; they describe what a group of fields controls and flag requirements.
If a dropdown is empty after you change a connection or object, use the refresh control on that field rather than saving and re-opening the node.
When a field you expect is not visible, check the field it depends on first — an unset dependency is the most common reason a field is hidden.
Section headers, info boxes, and dividers are guidance only; there is nothing to fill in those elements.